Why MuPAD?
MuPAD is a registered trademark of SciFace Software GmbH & Co. KG. MATLAB and Simulink
are
registered trademarks of The MathWorks, Inc. See www.mathworks.com/trademarks
for a list
of additional trademarks. Prior to the R2016a release of MATLAB® (March 2016), the MuPAD Notebook was the primary interface for performing and
documenting symbolic math calculations. Starting in R2016a, the recommended approach is to use the MATLAB Live Editor.
In contrast to numerical computations, there are symbolic computations in
computer algebra as computations with symbols
representing mathematical objects. Here, an object may be a number, but also a
polynomial, an equation, an expression or a formula, a function, a group, a ring,
or any other mathematical object. Symbolic computations with numbers are
carried out exactly.
Most of the current computer algebra systems can be used interactively. The user
enters some formulae and commands, and the system evaluates them. Then it
returns an answer, which can be manipulated further if necessary.
Moreover, modern computer algebra systems provide a powerful programming
language (since the MuPAD is a version of Maple, its programming language is structured similarly to Pascal, with extensions such as language
constructs for object oriented programming) and tools for visualization and animation of mathematical data. Also,
many systems can produce layouted documents (known as notebooks or
worksheets). The MuPAD system has such a notebook concept, but we will only
sketch it briefly in this tutorial. Please check the user interface documentation
instead for more details. The goal of this tutorial is to give an introduction to the
mathematical power of the MuPAD language.
MATLAB is computer programming language used for numerical calculation and systems modeling. Its popularity has been growing over the past few years and has become one of the standards for use in many engineering and applied mathematical practices. MuPAD is a simple sub-language of MATLAB based on Maple's coding style. MuPAD is by far the quickest method of symbolic calculation in MATLAB, and remains mostly as powerful as Maple™. MuPADs can handle complex integration and differentiation, systems of equations, linear algebra functions, plotting, and more in mere seconds. For previous users of Maple, most of the syntax will be very similar. The goal of this tutorial is to touch on the MuPAD Notebook and show how it can be used as a quicker method of calculations, especially for homework applications.
Learn Differential Equations!
By going through this tutorial in its entirety, you will learn the equivalent material from Brown Courses APMA 0330 - equivalent to a standard sequence of Differential Equations 1 and 2 at the Undergraduate level. Topics in differential equations will be presented with the assumption of a working knowledge of Calculus I and II (up through Differential Calculus) - what is needed from Calculus III (Multivariable) and Linear Algebra will be covered in the tutorial. If you are an avid learner, you may be able to jump right in with a working knowledge of highschool calculus.Basics
Double click your MATLAB Icon to open the MATLAB GUI. Then you can start MuPAD by typing
>> mupad
You will see the screen that should appear
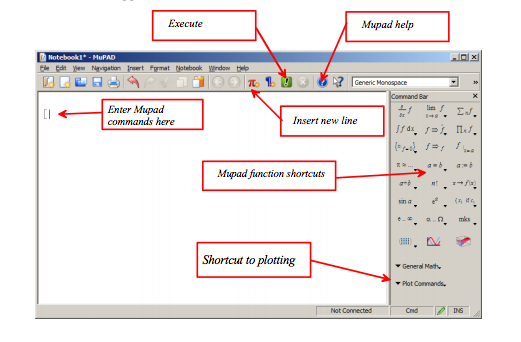
This is your MuPad shell. You can type commands into this window, and it will solve problems for you. You can type commands into this window, and it will compile them automatically and give you an answer. The shell is great, but it works off of Random Access Memory and will not save your variables or work once you close the program. This is why most people write a script, or a savable document that can perform your calculations through the shell. To open an existing MuPAD file with the extension .mu in the MATLAB Editor, double-click the file name or select Open and navigate to the file. After editing the code, save the file. Note that the extension .mu allows the Editor to recognize and open MuPAD program files.
For our purposes, we want to launch the MuPad Notebook. This is simply a program inside of MATLAB that works better for the calculations we will be making. Most of the buttons should be self-explanatory.
NOTE: MuPAD distinguishes between uppercase and lowercase. Most common errors are found because a variable word was either spelled wrong or had some form of wrong capitalization.
In a MuPAD™ notebook, you can convert characters in the text region to Greek letters one at a time:
a) Select the character you want to convert or place the cursor to the right of the character.
b) Select Edit>Toggle Greek.
For example, display the Greek letter δ by typing d and then placing your cursor to the right of d and selecting Edit>Toggle Greek.
Symbol::new(symname) or simply Symbol(symname) creates the typesetting symbol corresponding to symname.
The typesetting symbols can be accessed in two different ways: Most symbols can be input by typing Symbol::symname, where symname is taken from the lists in the introduction. For some symbol names (such as not or I), this is not possible in the MuPAD® language. What is possible in any case is to invoke Symbol as a function, taking a string representation as its argument, as in Symbol("not").
Any line with an open bracket “ [ ” is a calculation line. Work in calculation lines will appear in red text and their answers will appear in blue text. All other lines are considered comments and plain text, will appear in plain black text, and will not be executed as functions. A new calculation line can be made by pressing the red pi button, and a new line of text with the blue paragraph button.
Pressing [Enter] after a line of code will execute that code (in a calculation line). You can change code at any time, and re-calculate it by going to it and pressing [Enter] again. Or if you have several lines to run at once, the first few choices under the drop-down menu “Notebook” will give you options for how to re-run your code after making changes.
Try typing into the top text line and executing a simple calculator function:
This is an arithmetic test:
[ 2+2
4
[
Notice that a new calculation line will automatically appear after you execute your line of code. Remember that you can always create a new text line after a calculation answer by clicking after the answer on the same line and pressing the blue paragraph button.
When you are creating a large notebook for all your homework problems, it is a good rule of thumb to have many comments telling the grader what question you are on and what calculation you just performed. Sometimes it is best to suppress the answer after a calculation (aka – run the calculation but not have it display the answer). This may sound ludicrous, but you will probably find yourself wanting to suppress answers to save space and time in the future. A colon “ : ” after an expression will suppress its output, but still perform the calculation.
Example:
[ 2+2:
[
From this point onward, I will drop the brackets before a calculation line to make the command text easier to copy and paste into your own MuPad. Calculations will appear in red and the answers below it in blue.
Brown Uniiversity, Applied Mathematics
This tutorial was created in conjunction with Applied Mathematics course APMA 0330 for Brown University Students. Others may feel free to learn on their own from this website, but please credit our site. If you would like to use this content for any reason, please contact Vladimir Dobrushkin at Brown Applied Mathematics. This tutorial started its life during the 2013 by Ryan Gourley '17 under the direction of professor Vladimir Dobrushkin.
Return to computing page
Return to MuPad tutorial page for the second course
Return to Matlab tutorial page for the first course
Return to Matlab tutorial page for the second course
Return to the main page (APMA0330)